Knee-length Petticoat Tutorial

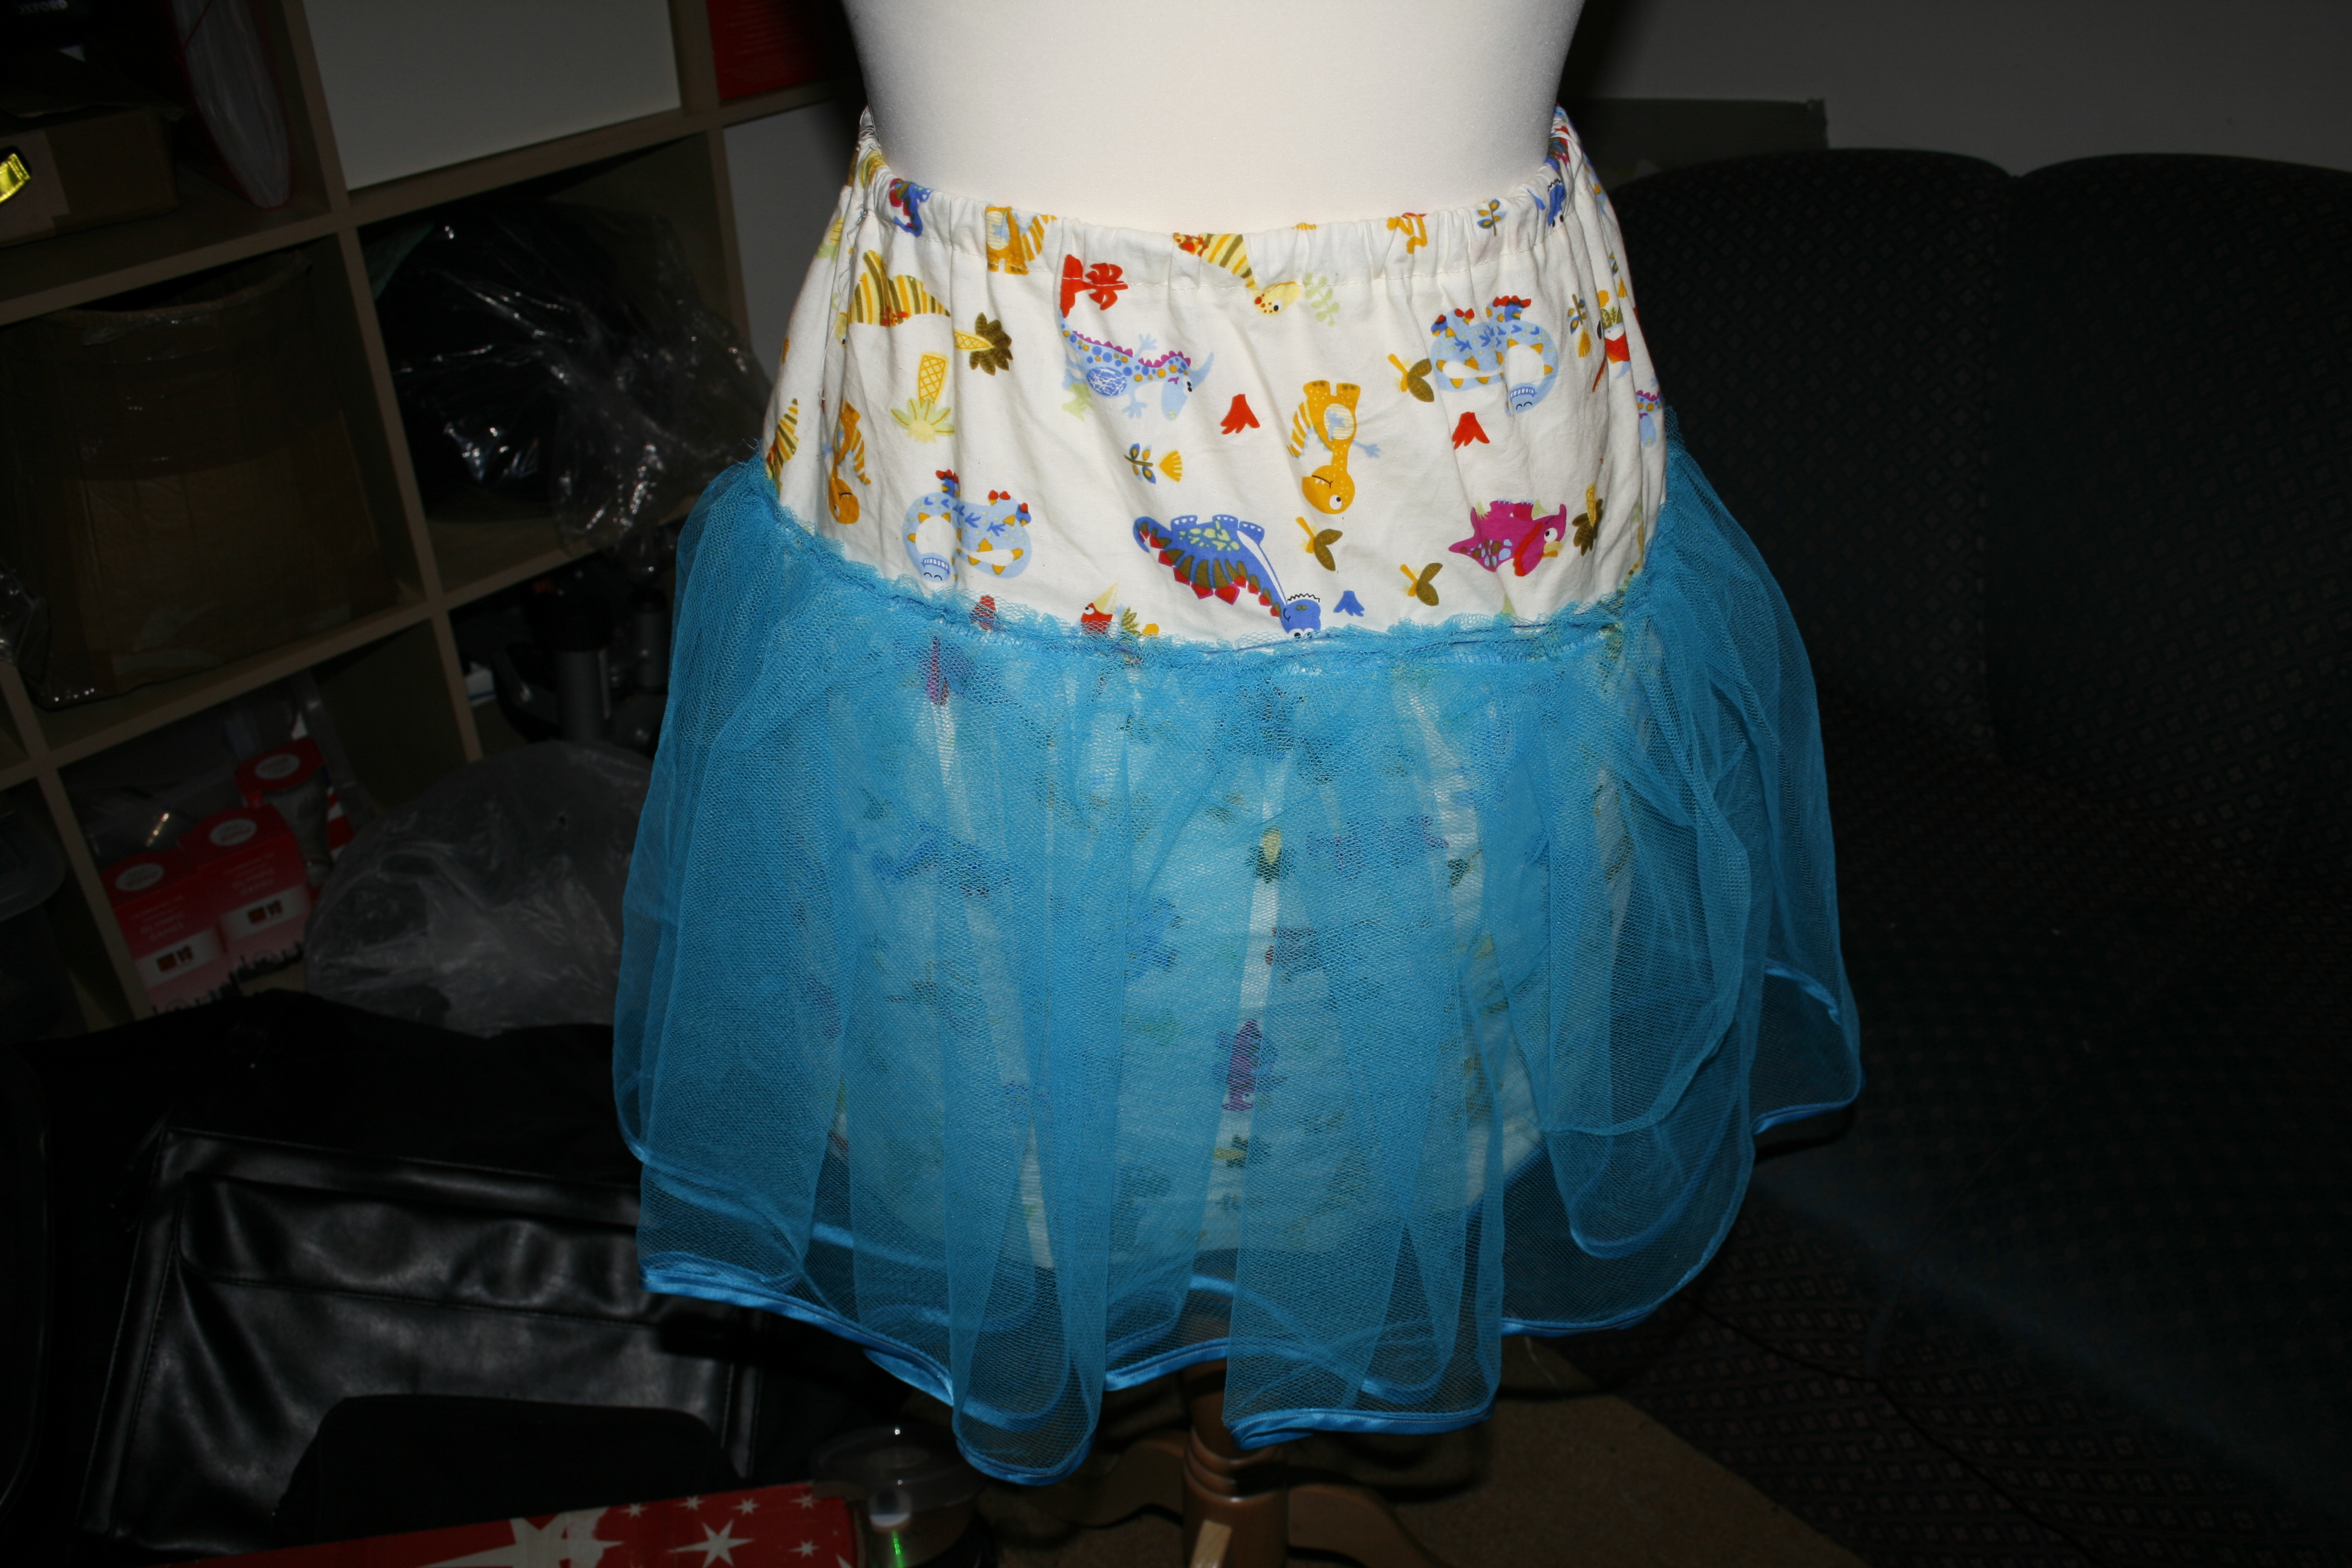
This tutorial is for a knee length petticoat worn with this dress.

You can buy one here.

2014-06-27 21.34.07

This is quite an easy design of petticoat to make, you will need:

  • a rectangle piece of cotton measuring ‘measurement between waist and knee’ times ‘hip measurement + 3″ ease’.  I used left over material from this dress.
  • 1.5 X ‘hip measurement’ of tulle netting. – This is for 2 layers of tulle, for more you’ll need layers you’ll need the same again for each pair of layers.
  • 6 x ‘hip measurement’ of bias binding ribbon in a matching colour. – Again for two layers of tulle.
  • a piece of 1/2″ elastic. To measure I took the elastic and pulled it tightly around my waist and cut to fit.

Make the lining.

  • Cut out the pattern piece – No need to add seam allowance as this is included in the measurements above.
  • Fold in half. petticoat pattern
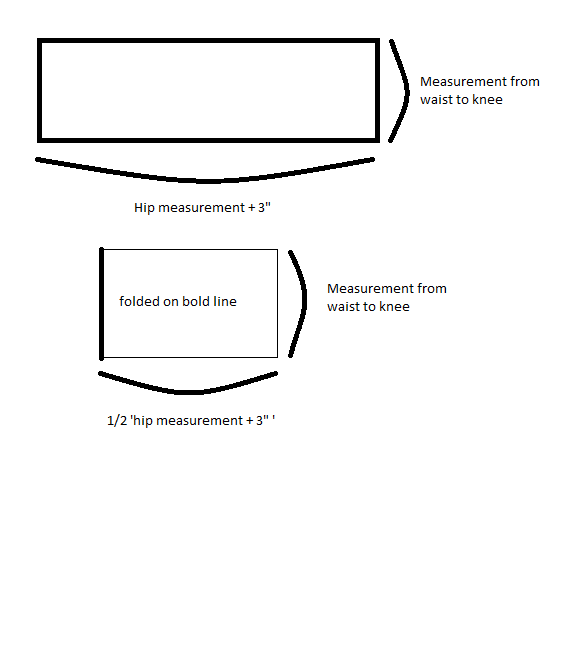
  • Sew along open edge measuring from waist to knee.

Hem bottom edge

  • I’ve used a double-fold hem as described here, this keeps all the raw edges inside the hem.

Creating the waist band

  •  Again I use a double-fold hem, this time make sure the waistband is at least 3/4″ wide.
  • Make sure to leave about 2″ of the waist band open to feed the elastic through.

Tulle layers

Do this for each layer of tulle you want on the petticoat.

  • Get the piece of tulle and fold twice along the length and cut along the folded edges. You should have 4 pieces of tulle measuring ‘1.5 X hip measurement’ by ‘1/4 of tulle width’
  • Sew 2 pieces of tulle together so you have a tube measuring ‘3 X ‘hip measurement’.

Edging the tulle in ribbon

Do this for each layer of tulle you want on the petticoat.

  • The binding will be folded so the raw edges are in the middle. bias binding ribbon
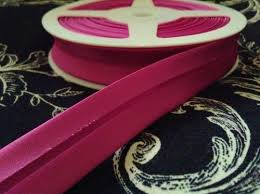
  • Fold the binding in half and press.
  • Line up the pressed line with the edge of the tulle, enclosing the edge in the binding and pin in place
  • Sew in place

.2014-06-27 21.34.42

Attaching the tulle layers to the lining

  • Pin all the layer together and baste together.
  • Pull one of the threads and gather evenly until the tulle is the same circumference as the lining. Use this tutorial here if you are unfamiliar with the technique.
  • pin the gathered tulle to the lining at 7″ below the waist.
  • Sew in place using a zip-zag stitch.

Putting in the elastic 

  • attach a safety pin to each end of the elastic.
  • Use the safety pin to push the elastic though the waistband.
  • Make sure to pin the other end to the lining.
  • Once all the way through unpin the safety pins and sew ends of elastic together.
  • Sew the gap in the waistband closed.

And now you have a completed petticoat.

2014-06-27 21.34.16-2 _MG_5352 2014-06-27 21.34.512014-06-24 16.45.55

Assassins Creed Outfit

You can buy one here.

A customer commissioned me to make a assassins creed inspired dress, She gave me a picture of a dress she liked and this is where I started. I decided to lace the back of the dress to give the back some support without using a zip. The customer wanted a full cloak instead of should cape in the picture below. For the red parts of this dress I used Dylon Tulip Red, 1 box of machine dye for 500g of material.

10438691_10203207213354222_319729930_n


I started with the bodice and decided to draft my own pattern.

Bodice Pattern


The material I used was quite transparent so I lined the bodice. In retrospect, I would have used a a weightier fabric that wasn’t as transparent. I gathered the bust pieces and attached them to the top of the waist panel. I attached all of the back panels together ( rectangular one in the middle) and then attached the front to the back.

2014-06-05 18.55.52


The next step was to design the skirt, which I made from 8 strips of 0.3 m by 1m. 4 of these red and 4 white. I hemmed each strip on 3 sides and overlapped them equally around the waist. To make attaching the skirt to the bodice easier, I attached the strips together and then sewed together the bodice and skirt. At the front of the dress, I tacked the panels together so the skirt only parted from mid-thigh.

For the lacing, I placed eyelets every 2cm up either side of the modesty panel and then used ribbon to lace.

2014-06-24 17.03.40

For the cloak, I drafted my own pattern. The top of the pattern was designed by pinning paper to my dress makers doll and drawing the shape I wanted. sew the two pieces together leaving a gap to be able to turn it inside out.

Cloak pattern


For the hood I used a pattern from Tally’s Treasury. I lined the hood in red and attached to the cloak along the neck line. Next, I braided some hemmed strips and attached to brass rings. I then hand stitched the cloak to the brass rings.

2014-06-24 17.10.15 2014-06-24 17.03.09

To attach the dress to the cloak, I added hook and eyes to both sides of each bust piece.

2014-06-24 17.01.37


Dinosaur dress

You can buy one here.

Each of the colleges at my university hold a themed end of year party. One this year was dinosaur themed and as I love dinosaurs I decided to go.

I decided to make a summer dress using dinosaur printed material. This material is a printed cotton which is quite weighty and a little bit transparent .

dinofabric

I used Newlook Pattern 6143 (A). I shortened the neckline of the dress by taking fabric out of the shoulders. This helped the top of dress lie flat across the collar bone.  I also Left out the sash and bow. As the material is a little transparent, I lined the bodice with some white viscose I had left over from my Assassin’s creed dress.

download (1)


The material has quite a busy pattern and the dinosaurs are printed in all directions. This made it impossible to match the pattern or cut out each of the pattern pieces with cream at the edge. So, I just decided to cut out the pattern pieces to use as little fabric as possible.

For this dress, I pretty much followed the instructions in the pattern. I did each of the bodice instructions twice and then used the arm binding and neck binding to attach the lining to the dress at those points. I attached the skirt and zip – hand stitched-  to both the bodice and bodice lining.

In the photos, I’m wearing the dress with a blue knee-length petticoat – find the tutorial here.

2014-06-24 16.45.03 2014-06-24 16.45.12 2014-06-24 16.45.50 2014-06-24 16.45.55


Daenarys’ Wedding Dress

You can buy one here.

I was commissioned to make Daenarys Targaryen’s wedding dress out of the first season of ‘Game of Thrones’.

Daenarys


I started with a pattern I drafted myself, using this tutorial.  I changed the skirt length from mid-thigh to floor length, which meant I had to bell the skirt to create enough room to walk. I also added another layer for the cross-over on the bust, for this I added 2 hemmed pieces – 0.5m x 1.5m each) across the sweetheart neck line.

For the lining I used a light weight poly-cotton, In retrospect I would use a heavier cotton as the floaty layer of the dress was heavier than expected. For the floaty outer layer I used a Viscose which dyes easily.

For this project I used Dylon antique grey, I dyed 600g of material with one packet of hand dye ( 50g of dye) . I expected that the fabric would come out quite light due to the amount of fabric I was dying; it instead came out the exact shade on the packet, which was too dark for my project. To remove the dye I used Dr. Beckmann’s colour run remover and left the fabric soaking overnight. Whilst it did remove most of the dye, it left the fabric a blotchy sand colour.  I then dyed it again using Dylon antique grey but this time only used 1/5 of the packet ( 10g of dye) and it came out perfectly.

DSC_0073


I added halter straps onto the bodice to help support the weight of the dress. The brooch for the centre is from an Etsy shop called RakunsellTaki .

10363392_10201403408887470_8278490444368997721_n


The next part of the outfit is the sleeves, these are separate from the main dress and are held up by armbands. The armbands are made by encasing a loop of elastic in fabric. The elastic is 20% smaller than her bicep measurement to ensure the sleeves stay in place. The Sleeves are hemmed isosceles triangles – 0.5m by 1.5m – which are hand sewn onto the armbands.

10458779_10201403450928521_870527433796959960_n 10409538_10201403411607538_6501780561886421628_n 1280832_10201403408807468_3146691896779409551_n

Cersei Lannister Dress

You can buy one here.

I needed a dress for a party which has a ‘game of thrones’ theme, so I decided to make my own. I used simplicity pattern 1487 ( Pattern A) as a basis for my dress.

Simplicity pattern 1487

I used a red linen for the main body of the dress and a blue flowery linen/cotton blend.

FabricRed FabricBlue

The pattern called for a side zip under the armpit but I felt that lacing down the back would be better. To do this I added 1.5 cm seam allowance to the back bodice and skirt pattern piece where there used to be a cut on fold instruction.  I also shortened the arm length as I have quite short arms!

The instructions are simple and easy to follow. The pattern called for a trim on the neck band to cover the stitching which I was not using. Therefore, I stitched the neck band by hand.  As the instructions called for a zip, I followed the the instructions for for the right hands side for the left hand side.

For the back lacing, I stitched the centre-back line from the bottom up until my hip point. I then hemmed, by hand,  the remaining distance to the neck line. Eyelets are placed at 1.5 cm intervals up the distance. For the lacing, I use a cord made with a Lucet.

Once the basic construction of the dress was completed, I added embroidery to the neck band. This was done with a stem stitch vine and split stitch buds.

2014-05-30 15.48.42DSC_00692014-05-30 15.46.36

I planned to add dark blue flowers and green vines to the sleeves.